Introduction
A
strain gauge is a resistive sensor whose resistance is a function of applied
strain. Under the effect of external force, the length and cross-section area
of a conductor changes. Due to this resistance change takes place. The
resistivity of the conductor also changes and this property is known as the piezoresistive
effect and is expressed through the gauge factor Gf of
the conductor. The value of Guage factor is ≈ 2 for most conductors. For
Platinum its value is 6. For silicon its value is upto 150.
Early strain gauges were
fine metal filaments. Modern strain gauges are manufactured primarily as
metallic foil using the constantan or Semiconductor elements (e.g., silicon
with trace impurity boron). They are manufactured by first forming a thin film
(foil) of metal or a single crystal of Semiconductor material and then cutting
it into a suitable grid pattern. This process is much more economical and is
more precise than making strain gauges with metal filaments.
The strain-gauge element
is formed on a backing film of electrically insulated material of polymide
plastic. This element is cemented or bonded using epoxy, onto the member whose
strain is to be measured. strain
from the object must be reliably coupled to the gauge wire, whereas the wire
must be electrically isolated from the object. The coefficient of thermal
expansion of the backing should be matched to that of the wire. Alternatively, a thin film of insulating ceramic substrate is
melted onto the measurement surface, on which the strain gauge is mounted
directly. The direction of sensitivity is the major direction of elongation of
the strain-gauge element. To measure strains in more than one direction,
multiple strain gauges (e.g., various rosette configurations) are available as
single units. These units have more than one direction of sensitivity.
Gage
resistance values range from 30 to 3000 ohms, with 350 ohms being the most
commonly used.
commonly used.
Theory
The change of electrical resistance
of a material when mechanically deformed is the property used in
resistance-type strain gauges. The resistance
R of
a conductor of length ℓ and
area of cross-section A is
given by
Under the influence of tensile force F, the length of the conductor increases by dL and diameter decreases by dD
and the resistance changes by dR.
Differentiating
both sides,
where
If the change in the value of resistivity of a material under
strain is neglected, the Gauge factor can be written as
The Poisson’s ration for all metals is between 0 to 0.5. This
gives a gauge factor of about 2.
Strain gauge Applications
Many variables—including
displacement, acceleration, pressure, temperature, liquid level, stress, force,
and torque—can be determined using strain measurements. Some variables (e.g.,
stress, force, and torque) can be determined by measuring the strain of the
dynamic object itself at suitable locations. In other situations, an auxiliary
front-end device may be required to convert the measurand into a proportional
strain. For instance, pressure or displacement may be measured by converting
them to a measurable strain using a diaphragm, bellows, or a bending element.
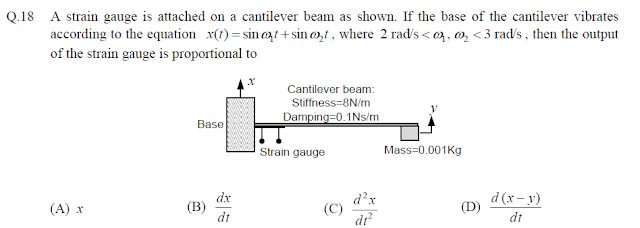
Acceleration may be measured by first converting it into an inertia force of a
suitable mass (seismic mass) element, then subjecting a cantilever (strain
member) to that inertia force, and finally, measuring the strain at a
high-sensitivity location of the cantilever element. Temperature may be
measured by measuring the thermal expansion or deformation in a bimetallic
element.
Strain Gauge measurement
The preferred circuit for use in strain-gauge
measurements is the Wheatstone bridge. One or more of the four resistors R1,
R2, R3, and R4 in the bridge may represent strain gauges.
The output relationship for the Wheatstone bridge circuit is given by
When this output voltage is zero,
the bridge is balanced. It follows from Equation above that for a balanced
bridge,
Equation
above is valid for any value of the load resistance RL,
because when the bridge is balanced, current i through
the load become zero.
Bridge Sensitivity
Strain-gauge measurements are calibrated with
respect to a balanced bridge. When a strain gauge in
the bridge deforms, the balance is upset. If one of the arms of the bridge has a variable resistor, it can be
adjusted to restore the balance. The amount of this adjustment measures the amount by which the resistance of the strain gauge has changed, thereby measuring the applied strain. This is known as the null-balance method of strain measurement. This method is inherently slow because of the time required to balance the bridge each time a reading is taken.
A more common method, which is particularly
suitable for making dynamic readings from a strain-gauge bridge, is to measure
the output voltage resulting from the imbalance caused by the deformation of an
active strain gauge in the bridge. To determine the calibration constant of a
strain-gauge bridge, the sensitivity of the bridge output to changes in the
four resistors in the bridge should be known. For small changes in resistance,
this may be determined as dVo/Vin.
Tee Rosette
Rectangular Rosette
Figure below
shows a rectangular rosette which is used when orientation of principal axes is
unknown. The gauge elements are mounted in 0°, 45° and 90° orientation. Typical setup is for each gauge element to become an
active arm in separate Wheatstone bridge circuits (i.e. a Wheatstone bridge for
each gauge element of the rosette).
Strain gauge installation
Proper
strain gauge installation is necessary to obtain accurate
experimental stress results. Skilled technicians usually install strain gauges after attending a
strain gauge school or training course. The decision on locations of the desired stress
measurements is usually made by the test sponsor or mechanical design team of the test item.
The instrumentation engineer must then ensure the following items are addressed. Failure to
proceed in this fashion will result in poor gauge adhesion, faulty data, and engineer frustration.
a. The
supplies should be on hand for the technicians to apply the gauges when the
time comes.
b. The
type of gauge, the material to which the gauge is to be mounted, and the environment
in which the gauge will be exposed.
c. Are
the principal axes known (many times they are not)?
d. How
long do these gauges need to be used?
e. Will
the gauges be submersed in a liquid?
f. Will
the gauges be exposed to temperature extremes?
g. How
long will the lead wires need to be?
h. Can
the bridge completion resistors be co-located at the site of the strain gauge?
Once all
of the supplies are on hand and the desired locations of the gauges known, the installation
process can begin. The following steps should be followed.
a. Surface
preparation. The surfaces to which
the gauges are to be applied must be free of paint, oil, grease, etc. The
surface preparation usually involves paint stripping, sanding, and degreasing.
b. Install gauge or
rosette. The gauge (or rosette) is applied to
the surface with an adhesive. Adhesives exist for a variety of environments and
desired lifespan. Cure times vary from a few hours to several days. Cure
temperatures can vary from room temperature to several hundred degrees
Centigrade. During the curing process, evenly distributed pressure is usually
required on the applied gauge(s).
c. Install bridge. The
bridge completion resistor assemblies and small wire terminals or solder tabs
may be bonded near the gauge. Small gauge wire is typically used to connect the
gauge to the bridge completion packs and to the wire solder tabs. The larger
gauge lead wires are then soldered to these tabs and completion networks (not directly
to the gauge itself).
d. Epoxies and sealants.
Finally, depending on the test environment, several additional coatings of
specialized epoxies and sealants may be needed to protect the gauge(s), bridge
completion packs, and/or wire tabs.
e. Patience and skill.
Skipping steps is not advisable.
GATE QUESTIONS
GATE-2007
GATE-2008
GATE-2009
GATE-2010
GATE-2012
GATE-2014
Semiconductor strain gages typically have much higher gage factors than those of metallic strain gages, primarily due to :
(A) higher temperature sensitivity
(B) higher Poisson’s ratio
(C) higher piezoresitive coefficient
(D) higher magnetostrictive coefficient
GATE-2015
A p-type semiconductor strain gauge has a nominal resistance of 1000 Ω and a gauge factor of +200 at 25 °C. The resistance of the strain gauge in ohms when subjected to a strain of +10−4 m/m at the same temperature is __________ Ω.
GATE-2018
A 1000 Ohm strain gage (Rg) has a gage factor of 2.5. It is connected in the bridge as shown infigure. The strain gage is subjected with a positive strain of 400 um/m. The output Vo (in
mV) of the bridge is (up to two decimal places) _____.


